


TrackMe Setup: The three ways to create a tracker
By Tyler Phillips, Splunk Core Certified Consultant
Today’s blog is about an app I was recently given to learn and it is a great app to use and keep track of data sources.
TrackMe is used to keep track of data ingestion and quality of that data. The way this app is configured, you can easily monitor thousands of data sources to make sure they are coming in consistently and be alerted when a data feed goes down. Using thresholds on delay and latency values means we not only can alert on how long we have gone without seeing data but we can alert when a data source takes too long to come into Splunk.
Today, I’ll show you how to get started with the three different ways to set up a data tracker in Trackme. These three are called Hybrid, Dedicated, and Shared.
Let’s start with the most useful tracker, the hybrid tracker. Hybrid trackers are used to auto-discover new entities that come from a data constraint. This allows us to look over a wide range of data and automatically create the entities for data sources.
We are going to start with a blank tenant. First click the “Manage: hybrid trackers” button in the tenant main screen.

You will then see a pop-up where we name the tracker and set the root constraint. I decided to use the data I am collecting from my mac for this tracker. So, my root constraint is “index=mac sourcetype=*”.

That’s all we need to adjust for a quick start but here is a list of all the adjustable parameters for a tracker.
- Identifier: Assign a unique name to the tracker.
- Deployment Target: Specify whether the data is local or from a remote Splunk deployment.
- Search Mode: Choose between tstats and raw search modes.
- Root Search Constraint: Define the base search criteria, such as specific indexes or sourcetypes.
- Break By Logic: Optionally, specify additional fields to segment entities further (e.g., by region or department).
- Time Quantifiers: Set the time range for data evaluation (e.g., earliest and latest times).
- Cron Schedule: Determine how frequently the tracker runs.
Now we just need to simulate the search and create the tracker! Once you have done this there will be another dialog box where you can run the tracker, click to run the tracker now.
You should now see data sources in the tenant! This will give you a data source per sourcetype since that’s how we set it up.

Dedicated Tracker
The dedicated tracker is used to look at a specific data source and having a dedicated tracker allows for more customization. Like specifying a particular search time field or field extraction you want to look for. I set up my next example with EVENTID=EXAMPLE to show this.
First to set it up we click the “Manage: elastic sources” button, then “Create new elastic source”. For my tracker parameters I am using these:
Entity Identifier – “Dedicated EVENTID=EXAMPLE”
Type of Search – “raw(local)” (using a raw search makes sure we can collect on search time fields and field extractions)

Search Constraint – “index=dedicated EVENTID=EXAMPLE”
Value for Index – “dedicated” (These inputs for value of index and sourcetype are just labels for the entity when you open them in TrackMe)
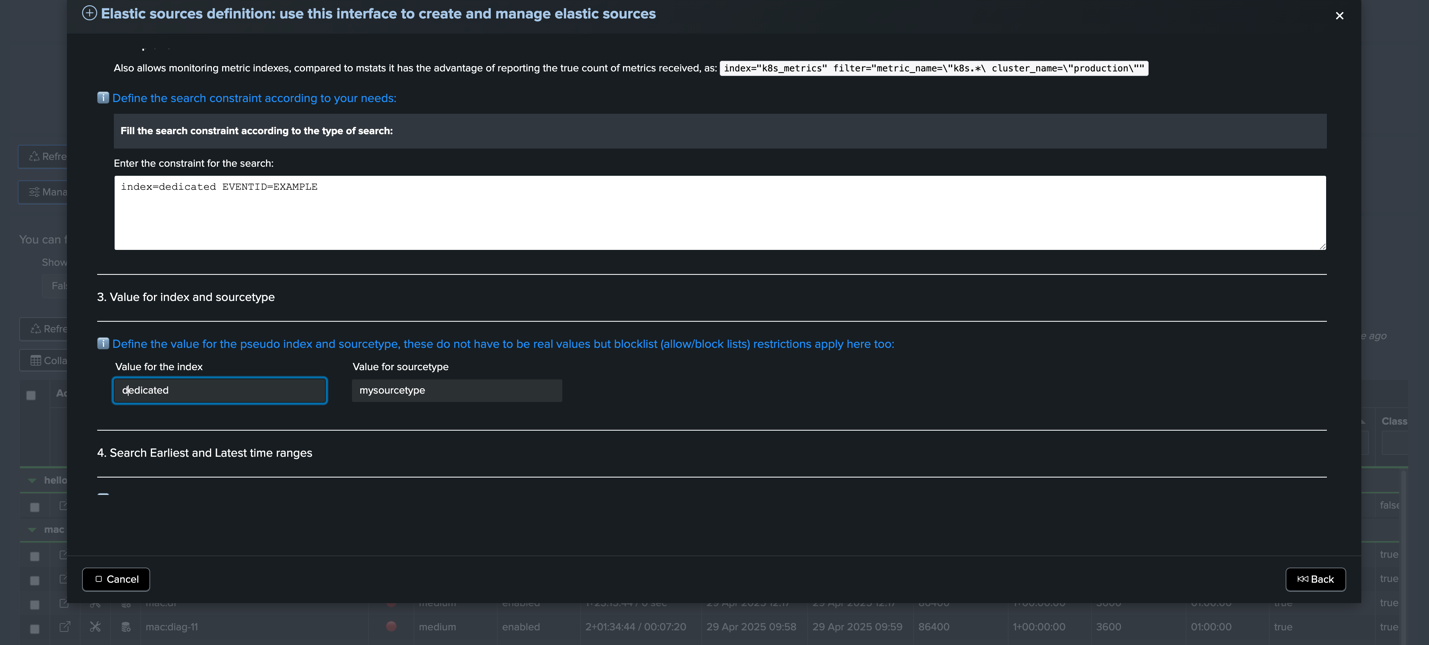
Earliest – “-4h” (this allows the tracker to look back at the past 4 hours for the events were searching for)
Now we can simulate the search and see if we get something back and then click “Add as new dedicated tracker”

Now we will find the “Dedicated EVENTID=EXAMPLE” entity in the TrackMe tenant!

Shared Tracker
Shared trackers are just like dedicated trackers except they put all the entities under one tracker. This way you can add your entities that require raw searches into one place but be careful not to put too many into a shared tracker if you have a small environment as this search could take more resources to complete. The helpful part of this is the ability to re-run one tracker and update many entities that have search time fields/field extractions.
The same steps used in creating a dedicated tracker can be used to create a shared one, except at the end you would instead click the “Add to the shared tracker” button.
I created two entities under the shared tracker. Shared and Hello entities. These two entities look at different indexes, yet they fall under the same tracker.

Running Tracker Reports
When running the different trackers, we can be selective with this if they need to be re-run. This is where separating your trackers can be useful. For instance, we have some entities that come in once a day and if for some reason Splunk doesn’t run the tracker correctly the one time in the day that we set it to run and we see the data is there, we can run the tracker again to correct any false alerts.
To re-run a tracker, we click the “Run: Trackers reports” button. From here we can select hybrid, dedicated, or shared.

Re-running the shared tracker will start the search immediately, the other two will give dialog boxes to select the specific tracker you would like to run.
Utilizing these different types of trackers correctly can help reduce processing and increase accuracy of your trackers so you can make sure your data is coming into Splunk as it should.
Need help optimizing your TrackMe setup or managing Splunk at scale? Talk to our experts!
About the Author
Tyler Phillips is a Splunk Consultant with a Splunk Core Certified Consultant certification. Tyler is also Splunk IT Service Intelligence Certified Admin accredited along with his Splunk Cloud accreditations. Tyler current learning goal is to receive the Splunk O11y Cloud Certified Metrics User Certification. Tyler has worked on projects customizing Splunk dashboards, Splunk ITSI, TrackMe, and upgrading Splunk environments to 9.x. He has gained experience with a multitude of Splunk items through the Splunk ODS service. In this service, Tyler has learned the ins and outs of troubleshooting and has gained valuable experience in Splunk problem solving. Tyler resides in Georgia and has received his Information Technology degree from Georgia Southern University.