


Splunk Cloud ACS Series – Part 1 – A Simplified Setup Guide
By Nate Hufnagel, Senior Splunk Consultant
When businesses first began moving to the cloud, skilled system admins and engineers everywhere lamented at the loss of control, which was native to their on-premise infrastructure and self-hosted applications. In recent years, cloud-native technologies like Splunk Cloud have matured enough to allow those same admins and engineers to regain some of the control they lost. One of those key features is our topic today: Splunk Cloud’s Admin Config Service, or ACS for short.
This guide will cover Splunk Cloud ACS installation and initial setup for commercial and FedRAMP environments. There are a few ways to setup up ACS in the latest version (including deprecated features), however this guide will walk through the latest supported approach. Before proceeding, make sure you have an account for splunk.com (same credentials you use for splunkbase.com).
Install ACS CLI – Mac & Linux
Method 1: Homebrew
The easiest way to install ACS is through installed Homebrew, one of the more popular package managers for Unix systems.
First, verify that Homebrew is installed on your machine:
brew doctorIf installed, you should see a response like this: “Your system is ready to brew”.
If not, install Homebrew with the following command:
/bin/bash -c "$(curl -fsSL https://raw.githubusercontent.com/Homebrew/install/HEAD/install.sh)"Next, install acs with the following commands:
brew tap splunk/tap

brew install acs
Method 2: Manual Install
If you’re more technically inclined, you can also get latest compatible tar ball from GitHub and install manually. You can also use wget, which comes out-of-the-box with most Linux distros:
wget https://github.com/splunk/acs-cli/releases/download/v2.17.0/acs_v2.17.0_linux_amd64.tar.gzInstall ACS CLI – Windows
Method 1: Windows Installer
Get latest version installer from GitHub
Follow the installation wizard instructions.
Method 2: winget
Use Windows Package Manager (winget). Download the latest version from GitHub, or the Microsoft Store.
Once winget is installed, run the following command to install ACS:
winget install acs-cliCreate ACS account and token
Create an ACS service account (with the sc_admin role) and token if you don’t have them already:
Settings>Users>New User
Settings>Tokens>New Token
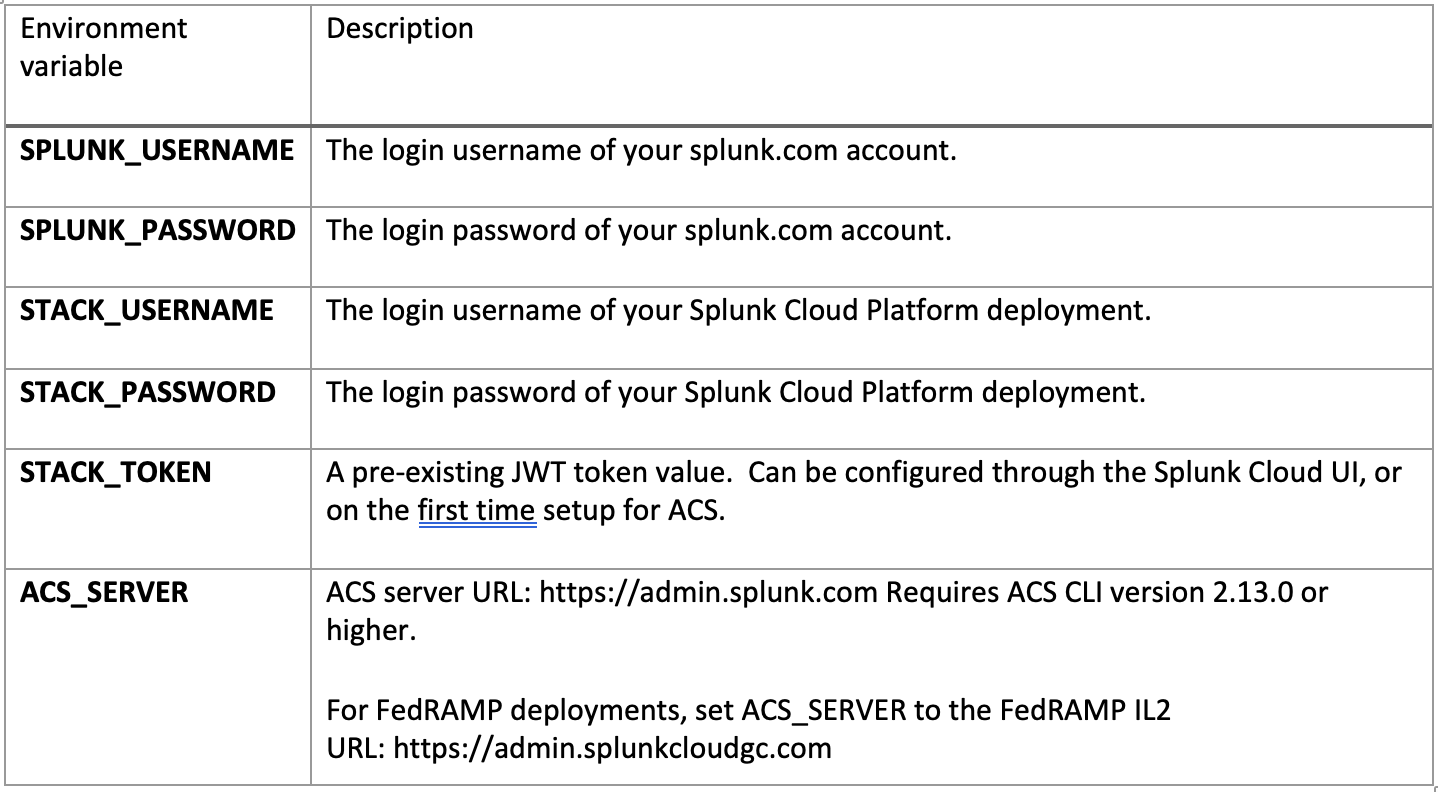
Set environment variables:
Next, setup the environment variables. There are some considerations at this step:
- If the account you want to use with ACS authenticates via SAML, a STACK_TOKEN is required.
- Tokens are optional for local Splunk accounts, so only username and password are required.
- You do not need to set the ACS_SERVER variable for non-FedRAMP environments. For FedRAMP environments, use the URL specified in the table below.
For Mac/Linux users:
Use the “export” command to set environment variables:
export ACS_SERVER=<value>…
export STACK_TOKEN=eyJ…
Check that the values are set correctly:
echo $STACK_TOKENFor Windows users:
Use the “set” command
set ACS_SERVER=<value>…

setSTACK_TOKEN=eyJ…
Check that the values are set correctly:
Cmd prompt
echo %SPLUNK_USERNAME%PowerShell
echo $Env:SPLUNK_USERNAMEReminder: You don’t have to set the ACS_SERVER variable for non-FedRAMP environments.
Complete ACS setup
All that’s left is to test the configuration and specify your Splunk Cloud stack. As of version 2.6.0 we can do this with one command:
acs setup <stack_name>…where the <stack_name> is the first segment of your SplunkCloud URL (https://<stack_name>.splunkcloud.com OR https://<stack_name>.splunkcloudgc.com).
Get Success message:

Verify you’re ready to start using ACS:
acs status current-stackOnce you’ve received the successful status message, that’s it! You’re ready to start using ACS to manage your Splunk Cloud stack. In Part 2 of this series, we’ll dive deeper into some ACS features, allowing us to automate the administration of our Splunk Cloud stack.
Reference Links:
How to Set Environment Variable in Windows
Administer Splunk Cloud Platform using the ACS CLI
Install Homebrew
Using Admin Config Service (ACS) in Splunk Cloud Platform FedRAMP environments
Learn more about TekStream’s Splunk Cloud services here.
About the Author
Nate is a former student athlete and skilled professional with a background in technology and sales. His 3+ years of Splunk consulting has added a depth of technical knowledge and a wide variety of soft skills. Security engineering and cloud architecture has been his primary technical focus, while continuing to sharpen his client-facing skills through pre-sales opportunities. He hopes to continue developing both skillsets for the rest of his career. He has an insatiable appetite for learning, a strong work ethic, and is eager to apply his knowledge.