


Get Your Custom App to Pass App Vetting on the First Try
By Nate Hufnagel, Splunk Consultant II
Introduction
Every day, more and more Splunk customers are moving from on-prem to Splunk Cloud. While this move simplifies architecting and cuts down on server admin costs, it also makes it more difficult for Splunk admins to install new and existing custom apps (read non-Splunkbase). All apps in Splunk cloud must pass a vetting process called AppInspect. Without understanding the inner workings of the AppInspect process, the task of making an on-prem custom app Splunk Cloud compliant can be tedious and time consuming. This guide will give step-by-step instructions to get your custom app to pass the FIRST time. By the end, you’ll have a cloud app template you can use for other custom apps.
Download Splunk Add-on Builder
To get started, it is recommended to download the Splunk Add-On Builder and start by using the default add-on as a template. It contains the bare essential directories and files expected by the app vetting process (plus some extraneous files that can be removed).
After downloading the app, navigate to the home page under Apps>Splunk Add-on Builder and click New Add-on on the far right. Enter the name of your app, and optionally edit the directory name as needed.
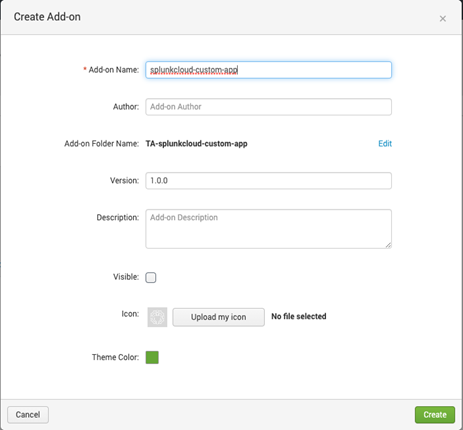
The resulting custom app will be created under $SPLUNK_HOME/etc/apps.
Prep the App
Next the app will need to be prepped in order to pass AppInspect. These are the most common items that must be addressed for apps to pass (easiest to do these from the command line. Assume that the working directory for all steps is “$SPLUNK_HOME/etc/apps/”):
- Remove addon_builder.conf in the app’s default directory
- Move the auto-generated app.conf from local to default
a. It’s recommended to use the auto-generated one, even if there is already an app.conf in the existing version of the custom app. - Modify the auto-generated app.conf to clear errors and warnings
a. Check that the package attribute and stanza already exist. Create them if they do not:
[package]
id = <custom_app_directory_name>
b. Add the following additional id stanza and attributes anywhere in app.conf:
[id]
id = <custom_app_directory_name>
name = <custom_app_directory_name>
version = x.x.x
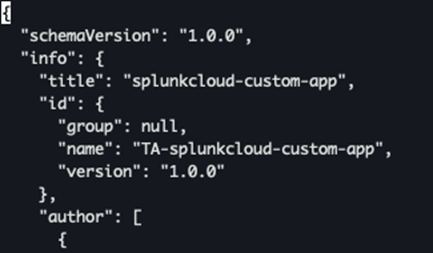
*Make sure the version numbers are the same if they are listed multiple times. - Ensure that app.manifest to matches what’s in app.conf
a. Check the first block of json and ensure that “info.title”, “info.id.name”, and “info.id.version” have values that match what’s in app.conf.
- Remove the local directory (double check that it’s empty first!)
- Add binaries/conf files
a. Be sure to place any executables in “bin/” and all Splunk configurations in “default/” - Edit default.meta with necessary permissions
a. The “admin” role is not available in Splunk cloud, so every reference in must be changed to “sc_admin”, which is the Splunk cloud equivalent.
b. If the original custom app has a local.meta, it must be merged into default.meta.

- Change permissions on app directories/files and compress the app
a. All files must be changed to allow others to read, while all directories must allow others to read/write.
b. On Linux/macOS, this equates to 755 for directories and 644 for files.
c. Once the permissions are correct, compress the custom app into a .tgz or tar.gz archive.
i. Note: if this is done on a mac, be sure to exclude any “__MACOSX” files. The command line options for this can vary depending on the current macOS version.
Install in Splunk Cloud
The new custom app is ready to be installed. Navigate to Apps>Manage Apps>Uploaded Apps>Upload app on the desired search head in Splunk cloud and select the custom app archive. Splunk will automatically run the app through AppInspect and create a report of its findings before installation, which can be viewed by clicking the “View Report” link in the pop-up window. If there are no issues, Splunk Cloud will give the option to install the package.
Note: It is recommended to also clear all warnings, even though the app can still technically be installed with warnings present.
Here are some of the most common “gotchas” to look out for:
- If the custom app contains scheduled reports within savedsearches.conf, make sure that they are disabled before vetting. To do this, ensure that every instance of “enableSched” is set to 0 or false.
- Same with any data models in datamodels.conf – ensure that “acceleration = false” or “acceleration = 0”
- If the app utilizes an SDK, ensure that it’s updated to the latest version.
And that’s it! By following this guide, you’ll be able to filter out the most common failures when building a custom app for Splunk Cloud. Depending on the complexity of the custom app, there may be additional failures to address in the custom config files.