


Creating Splunk Alerts (and Setting Permissions!) Through REST API
By: Marvin Martinez | Senior Developer
Creating Alerts via the Spunk REST API is fairly straightforward once you know exactly what parameters to use to ensure that Splunk recognizes the Saved Search as an Alert. The same applies for ACL permissions on these alerts and other Splunk Knowledge Objects.
First things first, let’s create a scheduled search via REST using the “/services/saved/searches” endpoint. The curl code below creates a simple search to pull some data from the _internal index for the last 10 minutes.
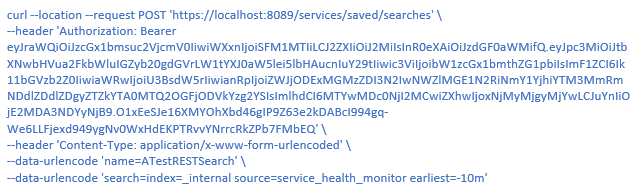
Note that, to create the saved search, all that was needed was authorization (a token in this case) and a couple of parameters in the call: (1) a name for the search and (2) the search itself.
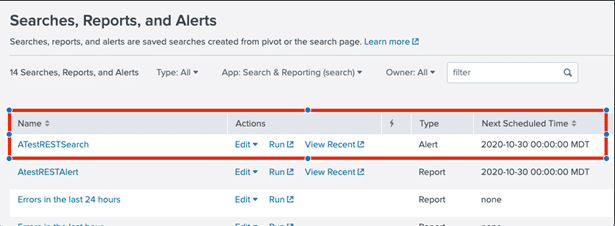
This will create a search in the Searches, Reports and Alerts screen in Splunk Web.
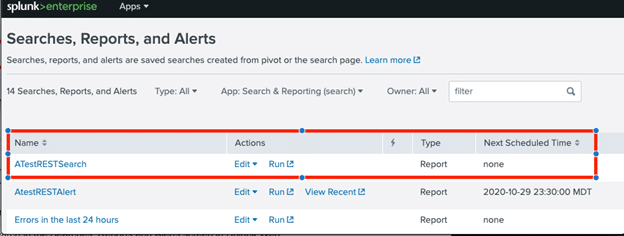
As you can see, the search has been created and shows up as a Report. But what if you need this to be an alert?! Even more importantly, what if you want to set this up with specific permissions? Well, luckily, like essentially everything else in Splunk, this can also be done via the REST API.
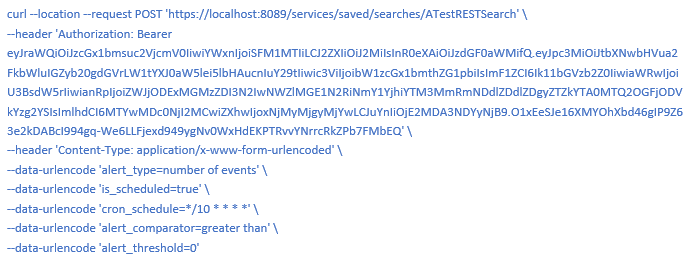
To create a new search as an alert, you’ll need to call the same endpoint as shown above with the parameters mentioned below. Otherwise, call the “/services/saved/searches/{name}” endpoint if you’re modifying a search that’s already created. For the purposes of this write-up, I will call the endpoint to manage an already created search (“/services/saved/searches/{name}”).
In order for Splunk to recognize the search as an alert, and not a Report, the following parameters have to be set correctly and passed along in your POST REST call. The table below outlines the parameter name and a brief description of what they mean.
| Parameter | Description |
| alert_type | ‘number of events’ (if this is set to ‘always’, which is the default, Splunk thinks it’s just a report) |
| is_scheduled | true (this is a Boolean setting that Splunk checks to make sure there’s a set schedule for the report, which is required for alerts) |
| cron_schedule | */10 * * * * (a cron schedule that represents the schedule which the alert will run on) |
| alert_comparator | ‘greater than’ (this is the operator used in the alert settings to determine when to send the alert – associated with the alert_threshold below) |
| alert_threshold | 0 (this is the number to compare with the operator above. i.e. only alert when results > 0) |
The curl command for the REST call is shown below. Note the aforementioned parameters that are now being included.
But how does this search now look in the Searches screen? As can be seen in the image below, once the REST command has been executed successfully, your Alert should now be reflected appropriately as an “Alert”.
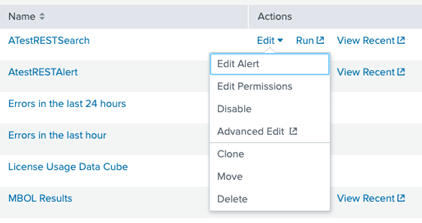
For further confirmation of these settings, click the Edit link under Actions, and click Advanced Edit from the drop-down menu. This will bring up a lengthy listing of all the settings for this search. If using the REST API is not your style, this is where you can alternately set these settings from Splunk Web.
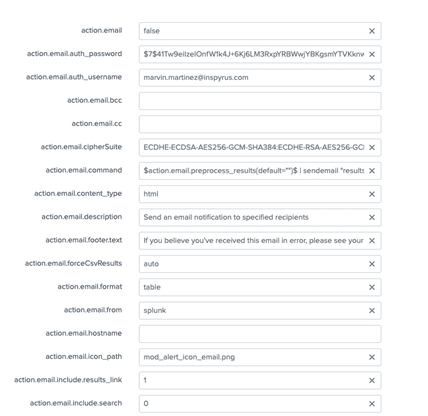
The listing looks something like this:
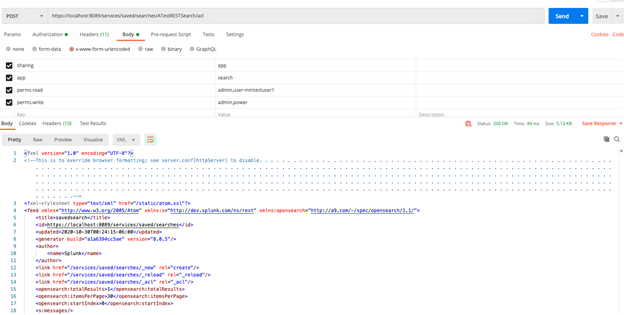
All that’s left now is to set your permissions as desired. To do this, you’ll need to call a new endpoint. You’ll use the previous endpoint you used to manage a specific saved search, but you’ll add a new section at the end for “acl” (i.e. ‘https://localhost:8089/services/saved/searches/ATestRESTSearch/acl’). This acl extension/option is available for any endpoint but, in this use case, we’ll use it to manage the permissions for the alert we created above.
In the case of a saved search, you’ll need to include the following parameters in your REST call:
| Parameter | Description |
| sharing | ‘app’ – this can also be ‘global’ or ‘user’, depending on what the scope of the access you want this search to have (This is required when updating the ACL properties of any object) |
| app | ‘search’ – this is the name of the app that this search belongs to. (For saved searches, this is required when updating ACL properties of these objects) |
| perms.read | A comma-delimited list indicating what roles to assign read permissions to |
| perms.write | A comma-delimited list indicating what roles to assign write permissions to |
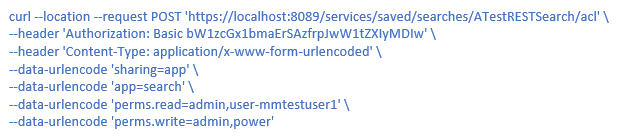
A curl command that was used in this case is shown below. In this example, the alert is being updated to give read permissions to admin and user-mmtestuser1. Additionally, it is being updated to give write permissions to admin and power roles.
As an added bonus, here is an example of how Postman was leveraged to make this final call, in case that’s your REST API-calling tool of your choice. The Authorization tab, in this example, was set to Basic Auth type with admin credentials. In the Body tab, you’ll set your parameters to the REST call as “x-www-form-urlencoded” values. Note the 4 parameters mentioned above shown included in the call below.
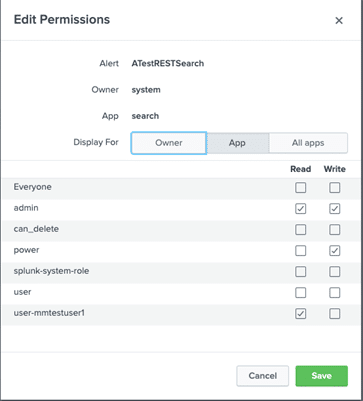
Once the REST call is made, navigate to your “Searches, Reports, and Alerts” screen in Splunk Web, and click to Edit Permissions of your alert. You’ll notice that your permissions are now reflected just the way you designated them in your REST call.
The Splunk REST API is a great alternative, and a necessity for many, to using Splunk Web to create and manage knowledge objects. Anything that can be done in Splunk Web can be done via the REST API, though it sometimes can be a bit hard to easily understand the process for how to achieve some of these desired actions. Now, you can easily create alerts and set the permissions just the way you want…and all through REST!
Want to learn more about creating alerts via the Spunk REST API? Contact us today!