
How to Forward Data to Splunk Cloud: Architecture Options and Step-by-Step Instructions
By: Forrest Lybarger & Khristian Pena | Splunk Consultants
Implementing Splunk Cloud prompts teams to make many decisions about their environment, from hardware specs to compliance standards. One of the big questions a team must answer is, “How will data be sent from devices like workstations and domain controllers to Splunk Cloud?” But that is more complicated than it may seem. Besides the niche forwarding methods (i.e. Splunk Stream App, which usually is mandatory for whatever data will use it), there are 3 options for forwarding data: directly via universal forwarder (UF), indirectly via intermediate forwarder (IF), or directly via a heavy forwarder (HF). Each of these methods has pros and cons that will be covered here, so anyone moving to Splunk Cloud can make a decision on how they will forward data. These strategies also aren’t mutually exclusive; they can be mixed and matched depending on individual circumstances.
Option 1: Send Data to the Splunk Cloud via a Universal Forwarder
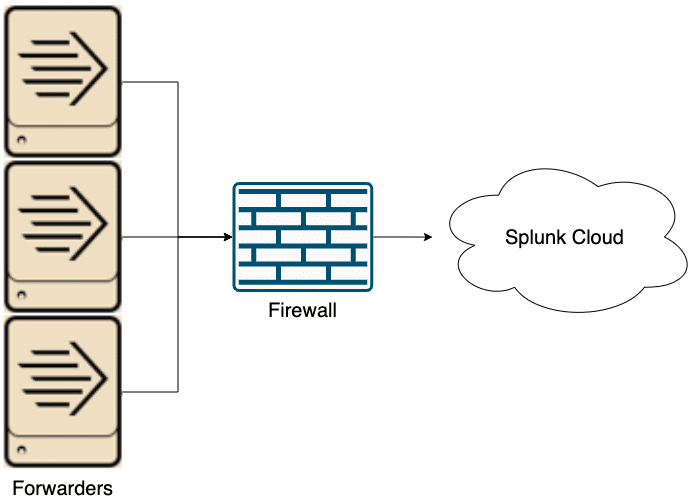
The first and simplest option is to send data directly from source hosts to Splunk Cloud via a UF. This approach doesn’t require any additional hardware (unless a deployment server is used) and has no single point of failure. UFs are installed on every source host and are configured with the environment-specific Splunk Cloud Forwarding app (downloadable from every Splunk Cloud Web UI). Problems emerge when considering the connection between the source hosts and Splunk Cloud. Firewall rules will need to be mended in order to allow outbound traffic from source hosts. With a small environment, this ask is easy to implement and maintain, but once the environment scales up, there can be thousands of firewall rules to maintain. The cut off for when this option is viable will depend on the customer, but in general this set up is best for small environments.
Option 2: Send data to the Splunk Cloud via an Intermediate Forwarder
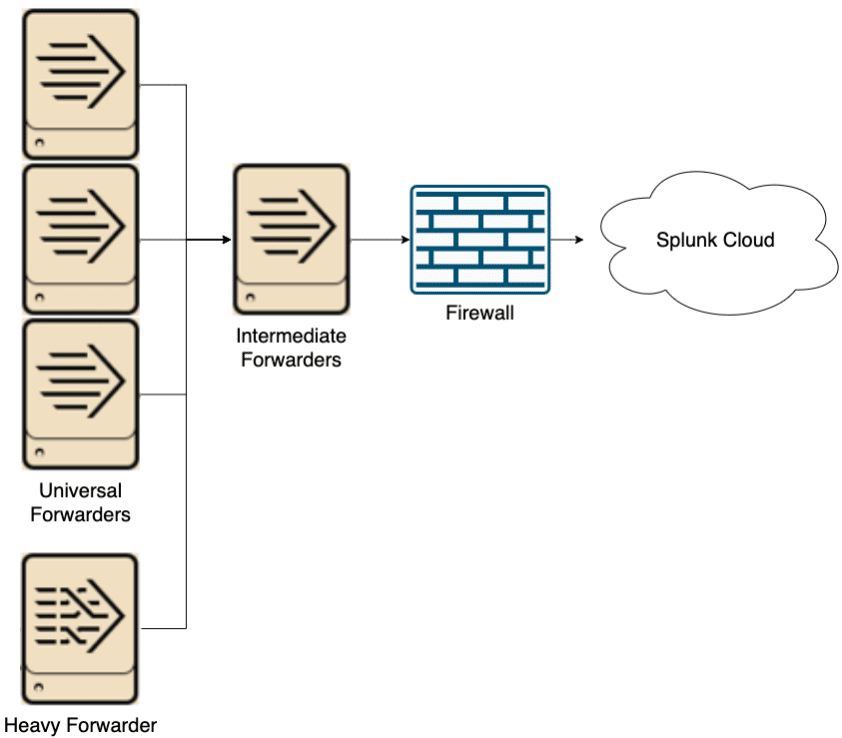
The second option is to send data to an intermediate forwarder before sending to Splunk Cloud. The intermediate forwarder will need to be on its own server in order to have the resources for processing large amounts of data. It is highly recommended to have at least two IFs to prevent a single point of failure (Splunk can load balance between IFs without a dedicated load balancer). IFs use the same software as UFs, so they are very lightweight and perform minimal processing. The main benefit of this architecture is to minimize firewall holes. With this approach, only the IFs will need special firewall rules maintained for them. You can also send heavy forwarder data through these IFs, though that will increase network load due to the increased size of parsed data. Another consideration with this plan is data transmission between data centers. If such a thing is not allowed, there will need to be IFs in every datacenter where there are UFs, and planning must happen to send data to the correct IF. Overall, this option is more scalable than the first, but requires more hardware and coordination.
Option 3: Send Data to the Splunk Cloud via a Heavy Forwarder
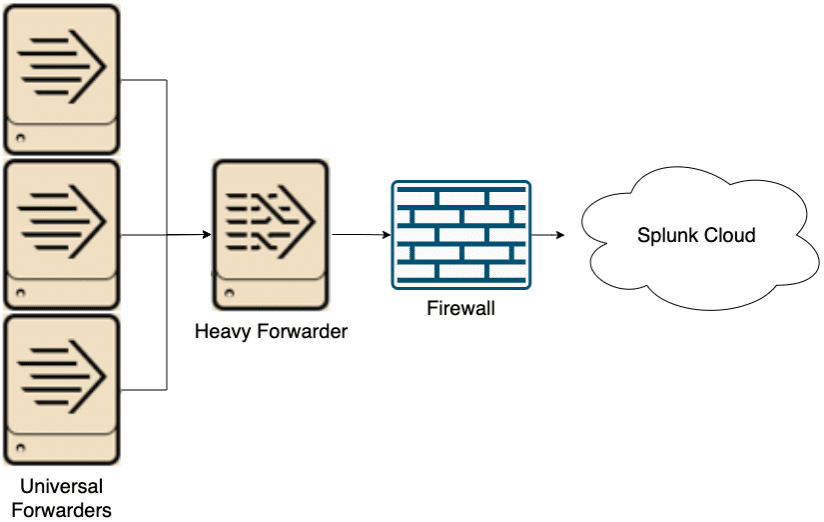
Finally, data can be sent to a heavy forwarder (HF) before going to Splunk Cloud. Similar to the previous option, the HF acts as an intermediary that requires its own hardware. The big change from the previous architecture is that the HF is a full Splunk instance and parses data sent through it. Parsed data will be significantly larger than unparsed data causing more network load, but will reduce load on indexers in Splunk Cloud and is necessary for some data (individual data source documentation will note if HFs are required). Two or more HFs are recommended to prevent a single point of failure. Like the previous option, this is more scalable than the first option, but requires more hardware and coordination.
In conclusion, the three architectures have their own purposes and can be used in tandem to fulfill each customer’s specific needs. For small environments where firewall management isn’t a problem, sending data directly from source hosts to Splunk Cloud is a viable option with limited extra expenditure. For larger environments, a mix of the other two methods is best. When there’s data that needs an HF, use the third approach. Use the second approach for other data to avoid excessive firewall rules. Whether or not to forward the HF data through an IF is up to the individuals. Doing so will use more network bandwidth, but sending to Splunk Cloud from the HF will require more firewall rules.
Forwarder Configuration to Splunk Cloud
Regardless of which architecture your organization decides to go with for sending local data to Splunk Cloud, you will need to install the Splunk Universal Forwarder software from your Cloud Deployment. The package is called Splunk Universal Forwarder Credentials, but you are able to install this app on your UFs as well as your HFs.
The Universal Forwarder Credentials file contains a custom certificate for your Splunk Cloud Deployment.
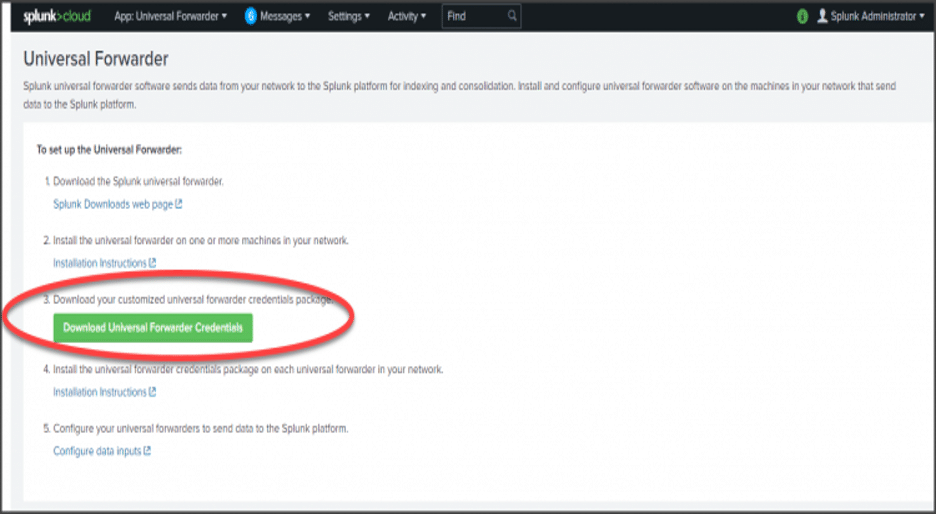
Download the Splunk Universal Forwarder Credentials:
- In your Splunk Cloud instance, got to Apps > Universal Forwarder.
- Click Download Universal Forwarder Credentials.
- Note the location of the downloaded file; it will be named splunkclouduf.spl.
- Copy the file to your /tmp folder on the instance that will be receiving the credentials or to your Deployment server.
Install the forwarder credentials on individual forwarders.
(We recommend managing all forwarders from your Deployment Server vs. manually updating each instance.)
This will only apply if you do not use a Deployment Server to manage your forwarders.
- Install the following app on your forwarder by running this command:
/opt/splunkforwarder/bin/splunk install app /tmp/splunclouduf.spl - When you are prompted for a login, use the user name and password for the Universal Forwarder instance. The following message will display when you have successfully installed the credentials package: App ‘/tmp/splunkcloud.spl’ installed.
- Restart the forwarder:
/opt/splunkforwarder/bin/splunk restart
Want to learn more about forwarding data to the Splunk Cloud? Contact us today!