
Splunk Alerts: Using Tokens to Prioritize Email Notifications
By: Brandon Mesa | Splunk Consultant
Background
Splunk Enterprise enables alerting through a variety of native and external alert actions. You can enhance your Splunk environment by creating alerts that add custom functionalities. Common alert actions include logging events, outputting results to a lookup, running a script, telemetry endpoints, sending emails, and many more. Additional Alert actions can be found at www.splunkbase.com.
Use case
A client wants to monitor their Splunk environment and be notified when their servers are not performing as expected. The client wants to monitor various key performance indicators, including, CPU, Disk, and Memory. While the client wants to monitor the performance of all their infrastructure, the main priority is ensuring production servers have as little downtime as possible. For this reason, the client would like to be alerted through email notifications when their servers are not performing as expected. Splunk search results that return a production server not performing up to expectations should send an email notification with the “Priority” set to the “highest” setting, which will deliver an email to recipients with the high importance icon. This will enable end-users to easily identify email notifications that should be prioritized.
To monitor server health, a Splunk alert should be created and configured. Returned results that meet the alert’s defined threshold should send email notifications to target recipients. The email alert should dynamically set the email priority based on the returned search results.
For example, if 3 servers are returned when the scheduled search is run, then the server environment should be dynamically evaluated by Splunk. If a server from the production environment is in the list returned, then Splunk will send the email notification marked as “important”, if not, then the email notification will be sent without any “high priority” settings configured.
Requirements
The “Send email” alert action, an out-of-box functionality that comes with Splunk Enterprise, partially meets the use case needs. Using the “Send email” alert action enables dynamic email notifications through the use of tokens. When an alert runs and search results are returned, the “Send email” action, evaluates the returned results to define the values for the tokenized fields set at configuration time.
Another way to configure email notifications is by using the SPL command “sendemail”. Various command arguments can be used with the “sendemail” command to configure email notifications. Furthermore, like the “Send email” alert action, the “sendemail” SPL command, enables users to dynamically define various email configuration settings with the use of tokens.
Tokens
By default, Splunk enables the use of tokens for select configurations for email notifications. Various configuration fields are enclosed within the “$” symbol. By enclosing a field name with the “$” symbol ($<token>$), field values can be dynamically defined based on various criteria, including returned results. Tokens can be set through the alert action GUI, or via SPL, by using the “sendemail” command. Splunk allows the following fields to be tokenized for email notifications:
- To
- Cc
- Bcc
- Subject
- Message
- Footer
More information on tokens, email notifications, and setting up alert actions can be found below:
Analysis
The goal is to notify users when servers meet or exceed a defined threshold. By using the “Send email” alert action, or the “sendemail” SPL command, we can alert specific recipients when servers are not performing up to expectations. We’ll also integrate the use of tokens to configure our email notification and define various email settings on the fly. The goal is to dynamically define our target recipients, as well as the email subject, message, and priority based on the returned results. To define these field values based on returned results we can use the tokens below for our configuration settings:
- $result.To$
- $result.Cc$
- $result.Bcc$
- $result.Subject$
- $result.Message$
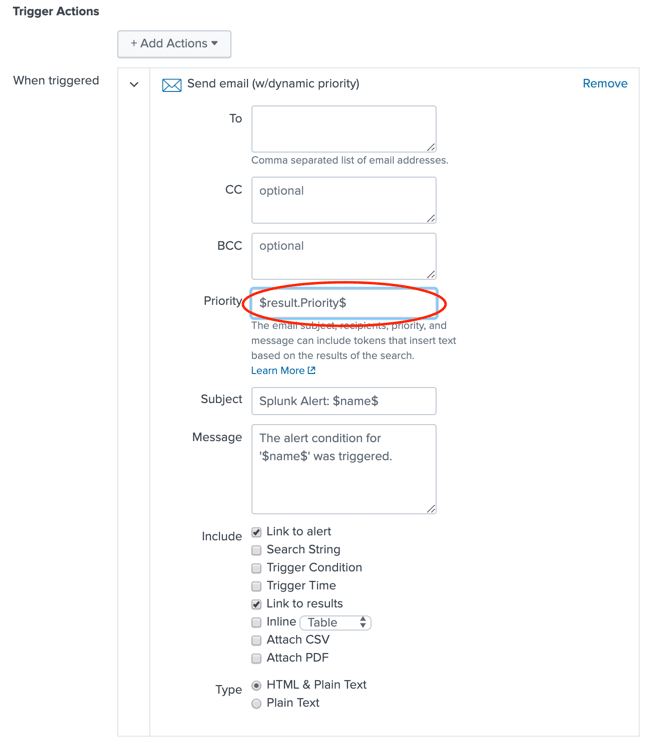
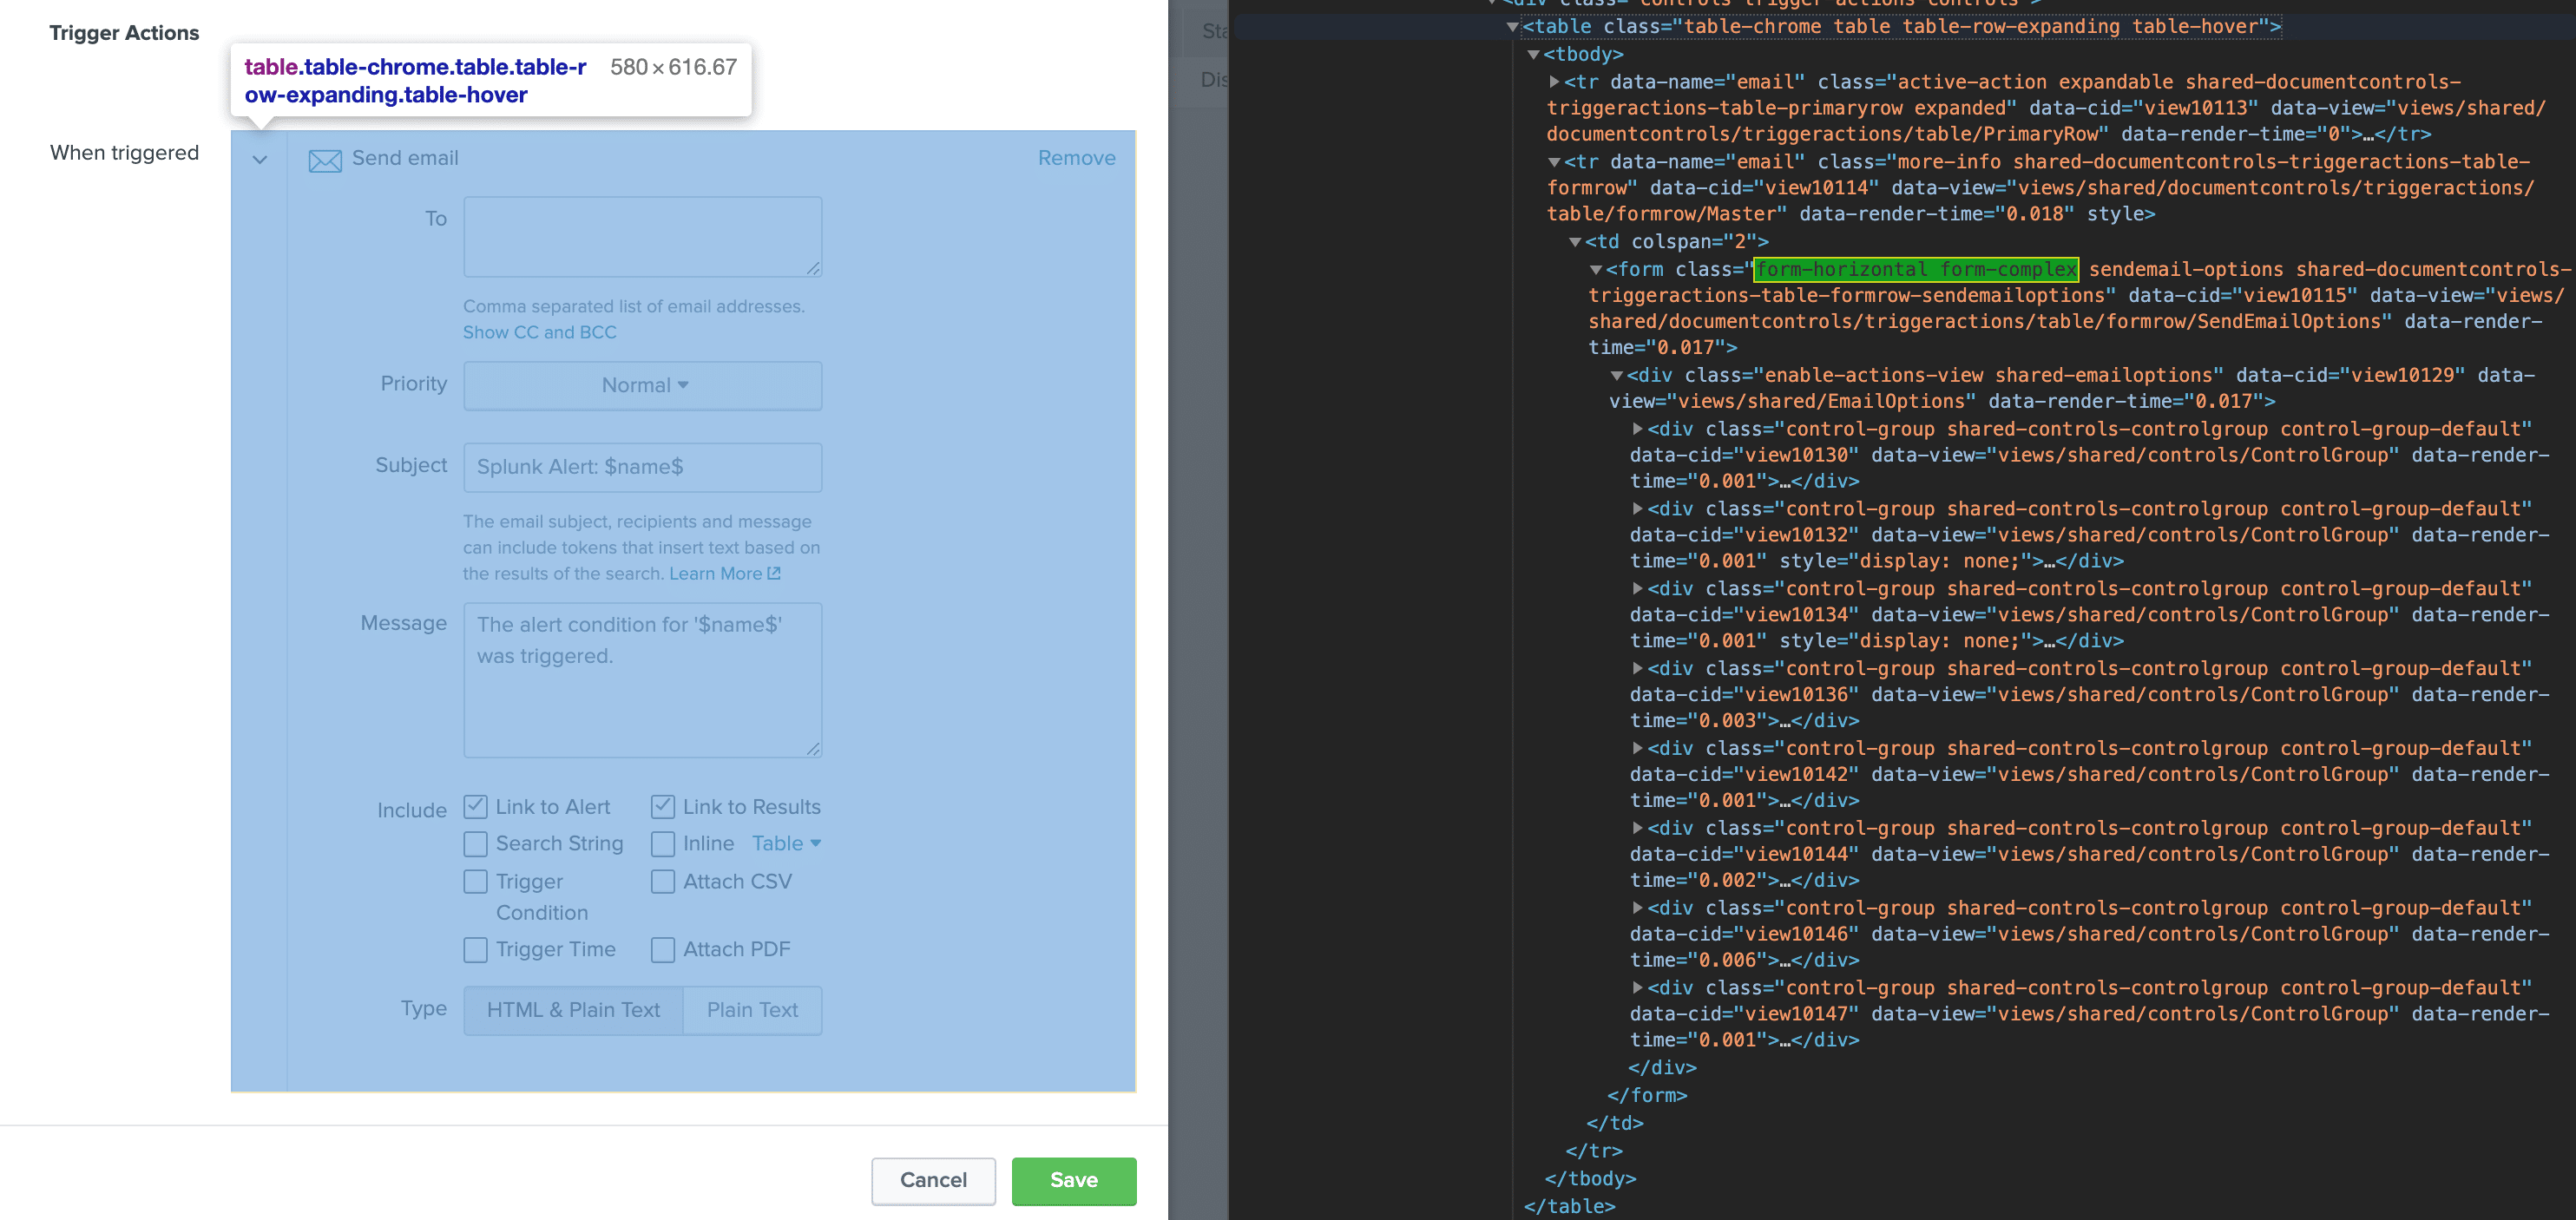
Using the token values above to configure our email alert will dynamically define the value for the target recipients as well as email subject and message. However, if we take a closer look at the configuration screen below, we notice that the “Priority” field is a drop-down that requires the selection of a static setting for the overall configuration of the alert being created:

Solution
By default, the “Send email” alert action requires the email priority to be set by selecting an option from the drop-down menu. Passing tokens to the “Priority” field is not an out-of-box feature with Splunk, whether the email notification is configured through SPL or via the GUI as an alert action. The goal of this blog is to walk you through how to optimize your Splunk environment to enable dynamic email “Priority” configuration with the use of tokens.
Solution
Let’s consider the out-of-box functionalities in a Splunk environment:
- “Send email” Alert action which enables triggered alerts to send email notifications
- SPL command (“sendemail”) that can send email notifications based on returned SPL results
- Tokens can be applied to various fields including To, Cc, Bcc, Subject, Message, and Footer to generate dynamic field values based on results returned.
We know the “Priority” field can’t be tokenized and therefore cannot be dynamically defined. This limits our email notifications to have a static email priority configuration setting. If the email priority setting is set to normal, and a result of high importance is returned, we’re at a loss. Email notifications will not be configured to send as important in this specific case. Now, let’s consider the functionalities needed to meet the defined requirements:
- Enable dynamic email prioritization based on our search results
- Pass tokens to our “Priority” field, as shown below:
We can enhance our Splunk environment to include this functionality by creating a new alert action and SPL command that mimics the functionality of the native “Send email” alert action and “sendemail” SPL command. Configurations for alert actions can be found in the alert_actions.conf file, while search command configurations are located on the command.conf file.
Let’s take a look at our Splunk environment, perhaps we can identify files which are related to our current “Send email” alert action or “sendemail” command. Follow the steps below in your Splunk Enterprise instance, via the CLI:
- $ cd $SPLUNK_HOME/etc/apps/search/default
- $ cat commands.conf – you should see a “sendemail” stanza
Looking at our “sendemail” stanza in the default commands.conf, we see that “sendemail.py” is executed to enable the “sendemail” command functionality. The goal is to clone, analyze, and modify the new custom sendemail.py script to enable the tokenization of the priority field.
To mimic the native “sendemail” command and “Send email” alert action, complete the following steps:
- Create a custom app with the necessary permission settings. More information on creating a custom app:
- Create a new commands.conf and alert-actions.conf file that replicates the configurations settings from the native “Send email” alert action and “sendemail” command functionalities.
You can do this by copying the stanza settings from the default .conf files and adjusting the settings as needed. Remember, our goal is to create a new SPL command (“sendemail”) and alert action (“Send email”) which mimics the native Splunk functionalities, yet enables the tokenization for the “Priority” field.
Modify the configuration settings to create a new command and alert action as needed. For example, you can name your new command “custom_sendemail” to differentiate it from the native Splunk SPL “sendemail” command.
- Place your commands.conf and alert-actions.conf in the default directory of your custom app.
- Place your modified copy of the “sendemail.py” script into the bin directory of your custom application. Remember, this script should reflect source code changes that enable the tokenization of the priority field.
- In addition to the commands.conf, alert-actions.conf, and sendemail.py files ensure your custom app has the appropriate *.html files to ensure your custom alert action is available in the user interface. You can use the “Developer Tools” feature within the Google Chrome browser to copy and modify the HTML source code for the “Send email” alert action.
See below:
At this point, your new custom app should include the following directories along with the following files:
- custom_app
- appserver
- static
- png
- bin
- py
- default
- conf
- conf
- conf
- data
- ui
- alerts
- html
- ui
- metadata
- meta
- static
- appserver
The custom commands.conf and sendemail2¬.py files will create a new SPL command that enables the tokenization of the “Priority” field. The alert_actions.conf and email_priority.html files will create a new alert action in your Splunk environment which enables you to pass tokens to the “Priority” field. For example, rather than having a drop-down menu for the email “Priority” selection, this alert action will enable you to pass the $result.Priority$ token and further enable dynamic email notifications.
Deployment
Your custom app should be deployed to your Splunk search heads and placed in the $SPLUNK_HOME/etc/apps/ path. If you are running a search head cluster, the custom app should be placed on the deployer’s, $SPLUNK_HOME/etc/shcluster, and pushed down to the cluster members.
Once your custom app is deployed to your Splunk environment, you can configure dynamic email notifications one of two ways:
- By creating an alert and selecting your new alert action. Pass the $result.FieldName$ token to the “Priority” field to configure email priority based on returned search results.
- By creating and saving a SPL search that uses the new “sendemail2” command. Verify that you have included the “Priority” command argument and pass the token within the search result as follows: Priority=$result.FieldName$. This will ensure your email notification priority is dynamically configured based on returned search result values.
Want to learn more about using tokens to prioritize email notifications? Contact us today!