SignalFx Agent Configuration for Docker and Gunicorn
By: William Phelps | Senior Technical Architect
This blog covers the basic steps for configuring the SignalFx agent and configuring a Python application running in Gunicorn to send trace data to SignalFx via the agent if Gunicorn is being executed within a Docker container.
Let’s start with a high-level overview of the technologies involved in the solution:
- – The SignalFx Tracing Library for Python automatically instruments Python 2.7 or 3.4+ applications to capture and report distributed traces to SignalFx within a single function.
- – The library accomplishes this by configuring an OpenTracing-compatible tracer to capture and export trace spans.
- – The tracer can also be used to embed additional custom instrumentation into the automatically generated traces. This blog will concentrate solely on the auto-instrumentation approach.
- – The SignalFx-Tracing Library for Python then works by detecting libraries and frameworks referenced by the application and then configuring available instrumentors for distributed tracing via the Python OpenTracing API 2.0. By default, the tracer footprint is small and doesn’t declare any instrumentors as dependencies.
- – Gunicorn, or ‘Green Unicorn,’ is a Python web server gateway interface (WSGI) HTTP Server for UNIX/Linux. The Gunicorn server is a pre-fork worker model and is broadly compatible with various web frameworks, simply implemented, light on server resources, and is fairly speedy.
The following notes are provided as general prerequisites or assumptions:
- – The SignalFx agent is already installed and initially configured on the Docker host. (The Otel collector is not yet compatible with this configuration.)
- – Alternately, the SignalFx agent can be deployed as its own Docker container, but this article assumes a local installation on the Docker host.
- – The SignalFx agent is already sending traces to the proper SignalFx realm and account.
- – The Docker host is assumed to be Linux. (RHEL/Centos/Oracle/AWS). The steps would be similar for Ubuntu/Debian, but the commands shown will be RHEL-centric.
- – Python 3 is installed on the host.
- – Ensure that proper access to Terminal or a similar command-line interface application is available.
- – Ensure that the installing Linux username has permission to run “curl” and “sudo.”
Process Steps
The general overall flow for this process is relatively short:
- Configure the SignalFX agent to monitor Docker containers.
- Create a Gunicorn configuration to support the tracing wrapper.
- Create a Dockerfile to deploy the application.
Docker Monitoring Configuration
If the SignalFx agent was installed previously, navigate to the folder where the agent.yaml resides.
Edit the agent.yaml file to enable Docker monitoring. Under the “Observers” section, add a type of “Docker” as shown, and under “Monitors,” add a type of “docker-container-stats.”
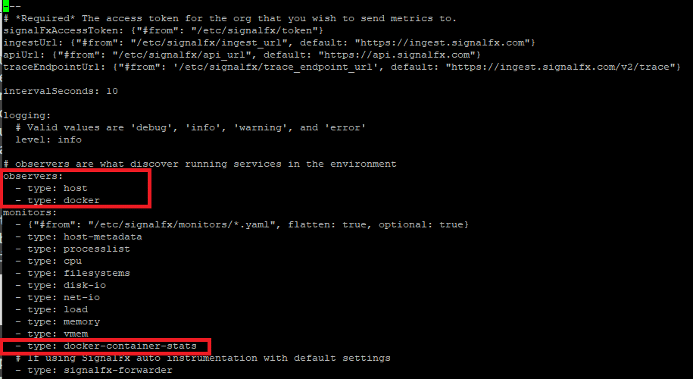
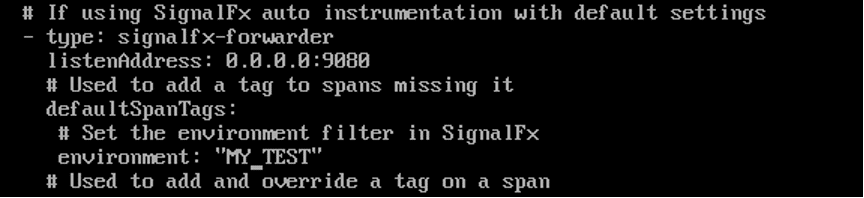
Also, under the “Monitors” section, ensure that for the type “signalfx-forwarder,” the attribute “listenAddress” is set to 0.0.0.0:9080, and not “localhost” or “127.0.0.1”.

Additionally, under the type “signalfx-forwarder,” uncomment the attribute “defaultSpanTags.”
Uncomment and set a meaningful value for “environment” as shown. This value will be sent with every trace from this host/SignalFX agent invocation and is used as a filtering device. “Environment” is a child attribute of “defaultSpanTags.” Be aware of the appropriate indentation, as YAML is very strict.
Save the file. At this point, SignalFx will be able to send Docker metrics data, but it likely will not be sending anything. A quick look at the logs via journalctl:

…will probably show a permissions issue with reading the Docker socket. Add the user “signalfx-agent” to the “Docker” group and restart the SignalFx service to address this issue.

Gunicorn Configuration
Use the following steps to configure Gunicorn for auto-instrumentation of Python for SignalFX. Again, the assumption for this blog is that Gunicorn is being deployed to a Docker container.
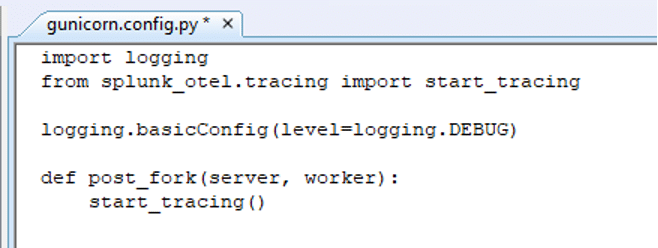
- In Python’s application root directory, create a file called “gunicorn.config.py”.
- The contents of this file should appear as follows (or be modified to include the following):
Local Docker Configuration
At a high level, the Dockerfile simply consists of the directives to create the necessary environment to add Gunicorn and the Python application to the container. These directives include:
- – Creating the expected directory structure for the application.
- – Creating a non-root user to execute Gunicorn and the application inside the container. (Running as root is not recommended and will likely cause the container build to fail.)
- – Setting environment variables to pass to the container context.
- – Loading the Splunk OpenTelemetry dependencies.
- – Launching Gunicorn.
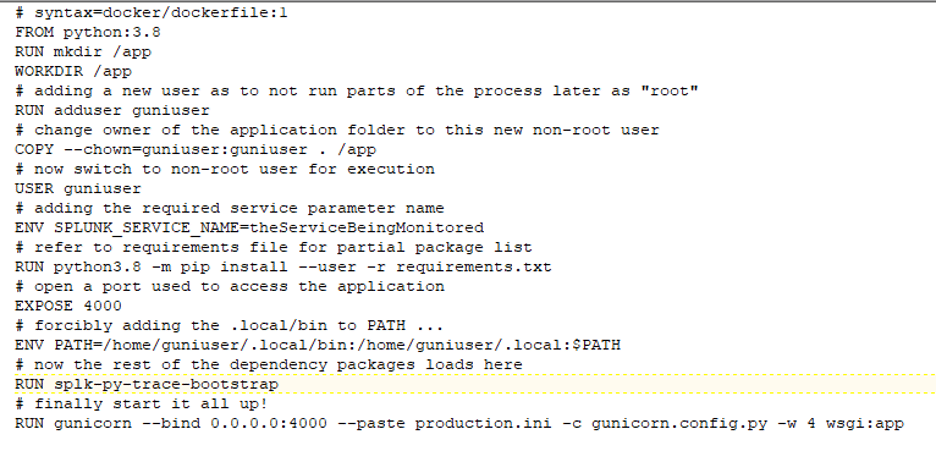
Please note the “ENV” directive for “SPLUNK_SERVICE_NAME” in step 7. The service name is the only configuration option that typically needs to be specified. Adjust this value to indicate the Python service being traced.
Other options can be found in the GitHub documentation under “All configuration options.”
This Dockerfile is using the Python3.8 parent image as the FROM target. Accordingly, the “pip” instruction in step 8 may need to be altered based on the parent image. The requirements file argument, however, should still be valid.
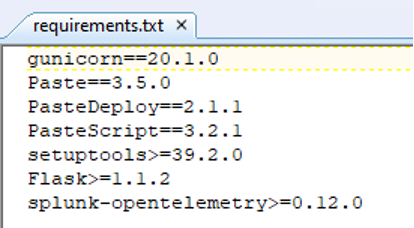
The requirements file appears as follows. This file lists out Gunicorn and specific Paste libraries, along with basic setup items and a version of Flask. The actual requirements for a project may vary. “Splunk-opentelemetry” in turn will load packages it requires. As such, this requirements file is not to be considered the complete library source.
Setting the PATH variable typically is NOT needed as shown in step 10. However, this ensures that the correct environment is present prior to running the bootstrap. The PATH must include the user’s “.local/bin” and “.local” folders from the home directory.
Finally, in step 12, note the use of both “- -paste” and “-c”. “ – -paste” of an .ini file allows additional configuration to be added to the build. “-c” is required to get the SignalFx configuration loaded that was defined in “gunicorn.config.py” earlier. This initialization line is shown to illustrate that both parameters can be used simultaneously. “-c” should follow “paste” if both are used.
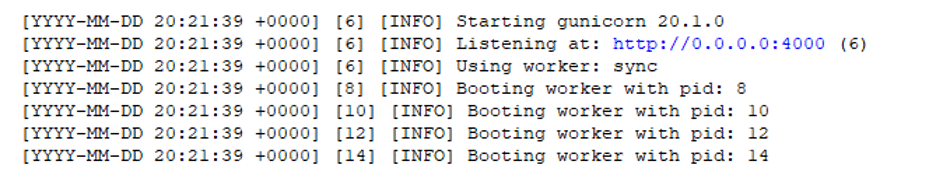
Running the Dockerfile will generate a lot of output, but the final lines should look something like this:
Checking in the SignalFx UI should show the new service defined in step 7 of the Dockerfile.
Contact us for more help on configuring SignalFx for Docker & Gunicorn!