
How to use Microsoft’s Office365 email with WebCenter Portal 11g
Microsoft’s hosted Office365.com service doesn’t yet have anywhere near the number of users as other services (like Gmail), but it is gaining popularity, especially as Microsoft phases out and merges its other hosted email services. Being able to integrate Office365 with a WebCenter Portal (WCP) or a WebCenter Portal: Framework (WCPF) application becomes more important as its popularity grows.
One way that we can integrate the two systems is email – both the ability to send email from the Portal through Office365, as well as let users access their Office365 mailbox from within your portal.
As it turns out, this is fairly easy to do! So, let’s dive in…
For the purposes of this article, we are going to look at configuring an out-of-the-box instance of WebCenter Portal v11.1.1.8.0 to a hosted instance of Microsoft Office365 for Business. Other versions of WCP and WCPF applications have a similar configuration process.
Gather Office365 Settings
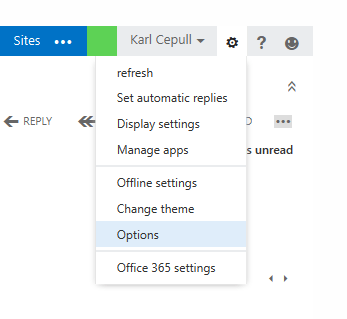 The first thing you’ll want to do is gather all of the various configuration parameters needed to connect to your hosted Office365 environment. Since WCP uses the standard IMAP and SMTP protocols to access mailboxes and send mail (respectively), all we need are the IMAP and SMTP values from Office365. To get this, simply log into your Office365 instance and go to your mailbox (“Outlook” tab). Select the ‘gear’ icon at the top right (next to your name), then the Options menu item.
This will display your “my account” page. Scroll all the way down to the bottom of that page, and you should see a link that says “Settings for POP or IMAP access…”. Click that link, and you will be rewarded with a popup page that lists the information we need.
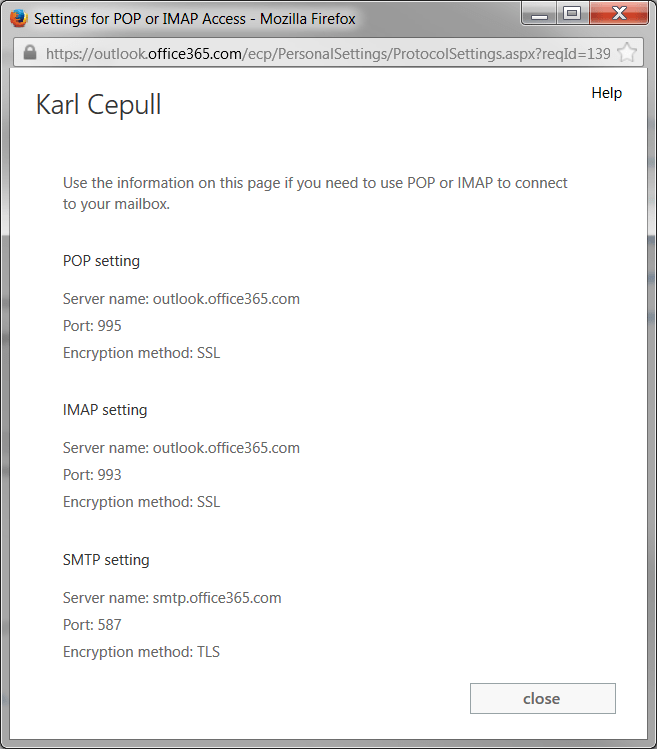
Leave this window open, or write down the information in the IMAP and SMTP sections, as we will need this in a bit.
Next, let’s work on the administrative settings in WCP.
WebCenter Portal Configuration
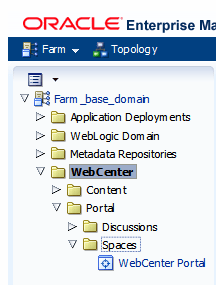 In your favorite web browser, open up the Enterprise Manager console for Fusion Middleware Control in the WebLogic domain that your WCP instance is in. (This is usually found at http://<WebLogicAdminServer>:7001/em or similar.) In the left-hand navigation tree, navigate to WebCenter / Portal / Spaces / WebCenter Portal.
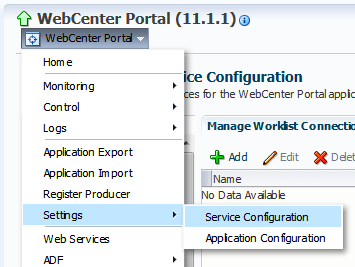 Right-click on the WebCenter Portal entry in the left-hand nav, or right-click on the WebCenter Portal menu just beneath the title of the main content window. Then, select Settings, then Service Configuration.
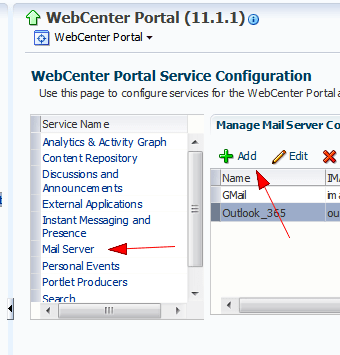
You will now see the WebCenter Portal Service Configuration screen. In the left-hand box (“Service Name”) is a list of services in WCP that can be configured. One of those is “Mail Server”, which is the one we want. Click on that one, and you will see a list of configured mail servers in the right-hand box labelled “Manage Mail Server Connections”.
Create New Mail Server Connection
Click the Add button to add a new connection.
Now, using the values from your Office365 account (that you wrote down above, or from the window that you left open), fill in the values in the first two sections. Below are the values I used based on my Office365 settings:
| Setting | Description | Example Value |
| Connection Name | This is a unique name to give to this mail server connection. The user doesn’t see this, so it can be anything that makes sense to you. | Office_365 |
| Active Connection | If you have multiple mail server connections, one of them should be marked as the “active connection”. This means it is the default mail server connection used. | <checked> |
| IMAP Host | The name of the IMAP server to use to retrieve a user’s mail. | outlook.office365.com |
| IMAP Port | The corresponding port for the IMAP server. | 993 |
| IMAP Secured | If checked, SSL will be used to connect to the IMAP server. This is strongly recommended if your server supports (or requires it). Office365 requires it. | <checked> |
| SMTP Host | The servername for the SMTP server. This is used when sending mail. | smtp.office365.com |
| SMTP Port | The port on the SMTP Host that is used for SMTP traffic. | 587 |
| SMTP Secured | If checked, will use SSL/TLS to connect to the SMTP server. Again, strongly recommended if your SMTP server supports or requires it. (Office365 does.) | <checked> |
| Associated External Application | The External Application to use to retrieve the user credentials to access their mail. (See below). | Create New… |
Create New External Application
When you select “Create New…” for the Associate External Application, a new screen will display for you to create the new External Application. An External Application is a way to define a set of credentials and parameters needed to log in a Portal user to another (external) application. For example, to log into Office365 and retrieve a user’s email, the Portal will need the user’s Office365 user name and password. It will then use that username and password to authenticate to Office365 and retrieve their mail. Each user has a different set of credentials, of course, so we need a way to let the user enter their individual credentials. That is what the External Application object is for (among other things).
For our purposes, all we need is the basic External Application object. In the Add New External Application for Mail Connection screen, fill in the following fields:
| Setting | Description | Example Value |
| Application Name | This is the name that this External Application will be referred to programmatically. | Office365 |
| Display Name | This is the name that the user will see. So, we want something that is descriptive to the user (so they know which set of credentials to enter). | Office365 |
That’s all you need! However, there are some optional fields you can add that may be of value. In the External Application object, under Additional Login Fields, you can add the following values. These will then be shown to the user, and they can optionally enter in values to use for their mail. All three should have the “Display to User” checkbox checked, which allows the user to see and update their individual values for the parameter. Additionally, leave the “Value” blank for all of them so there is no default value.
| Name | Description |
| mail.user.emailAddress | Specifies the email address to use when sending from the user. If blank, will use the user’s email address as defined in Office365. Note that to send from a different email address, the user must be granted permissions to send from that email address in Office365. |
| mail.user.displayName | The “friendly” name to use as the From address for sent emails. This could be the person’s name (e.g. “John Doe”), for example. If left blank, their email address will show as the “From” address. |
| mail.user.replyToAddress | What email address to send replies to. By default, replies are sent to the email address the original email came from. But, if you want email replies to go somewhere else, the user can specify that for this parameter. |
Click OK to save the new External Application, and you will be returned to the Mail Server Connection screen.
Everything should be filled in that we need, so click the Test button (top right) to test your entries. Note that the test only checks to see if it can connect to the IMAP host and port. It doesn’t verify that there is actually an IMAP server at that host and port, not does it test anything about the SMTP settings! (So, use the Test functionality with a grain of salt.)
Once you are confident your values are correct, click OK to save the new Mail Server connection. You then need to restart WCP to have your changes take effect, and we will be done with the “back-end” configuration. Do that now. I’ll wait…
Set Your User Preferences
Welcome back!
Now, we need to configure the user side of things. Specifically, we need to store our Office365 credentials in WCP so that it can access Office365 on our behalf. We will need to do this for each user of WCP.
Log in to WCP and navigate to the Preferences page. (If you are using the out-of-the-box skin, there should be a “Preferences” link near the top right of the page.) Click on the My Accounts link on the left to go to that panel.
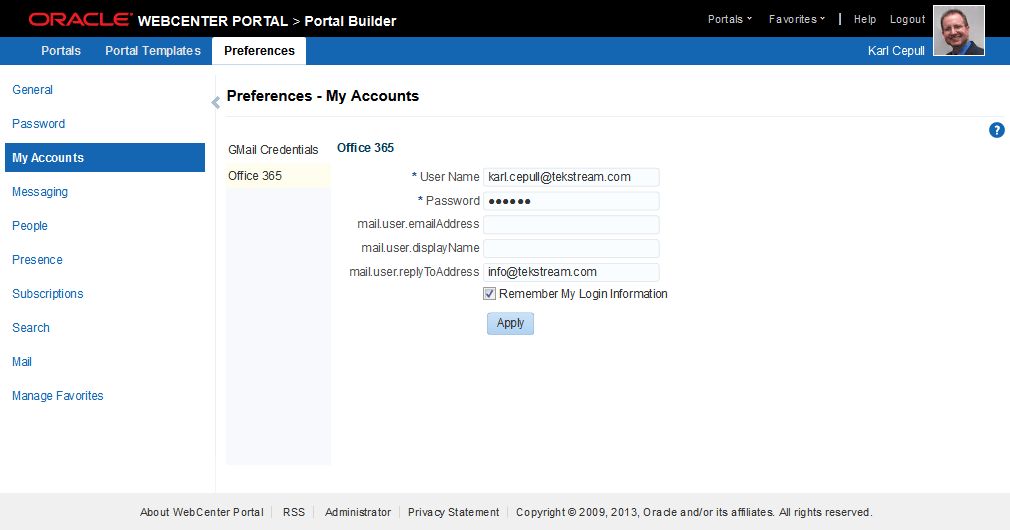
This panel lists all of the External Applications in a list. (In my screenshot, you can see “GMail Credentials” and “Office 365”.) For each application, you can enter a User Name and Password, plus any optional parameters that were defined. As you can see, for the “Office 365” application, the user can enter their Office365 username and password. In addition, they can optionally enter values for the 3 parameters we created – mail.user.emailAddress, mail.user.displayName, and mail.user.replyToAddress.
Enter your Office365 username and password (and optionally, any values for the other 3 parameters), and click Apply to save your credentials.
Then, click on the “Mail” tab in the left column to go to the “Preferences – Mail” page. On this page, you can select which Mail Server Connection to use. The default (“No Preference”) will use whichever Mail Server Connection is marked as the “active” one, but the user can override that here, if desired. (If you only have one Mail Server Connection defined, then this is moot.)
The second setting – Default Mail Client for Send Mail – however, is one that you definitely want to think about.
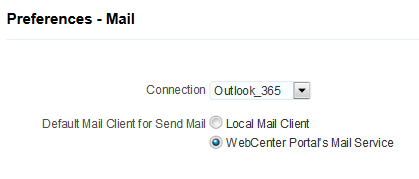 There are two options presented – “Local Mail Client” and “WebCenter Portal’s Mail Service”. These are only used when the user is attempting to send an email from the Portal. With the first option (“Local Mail Client”, which is also the default), when the user clicks a link to send an email, it will attempt to use their native mail client (e.g. Outlook, Thunderbird) to create the email. (It does this with a normal mailto: link.)
The other option (“WebCenter Portal’s Mail Service”) instead will display a “compose” form when the user clicks to send an email. When the user submits the form, the email message will be sent from the Portal using the selected Mail Server Connection. In other words, the Portal will attempt to connect to the Mail Server and send the email on behalf of the user. For our testing, then, select “WebCenter Portal’s Mail Service.”
Now, log out of the Portal and back in. (For some reason, the changes you make in Preferences are not always reflected immediately. Logging out and back in forces the changes to take effect.)
Let’s Test It!
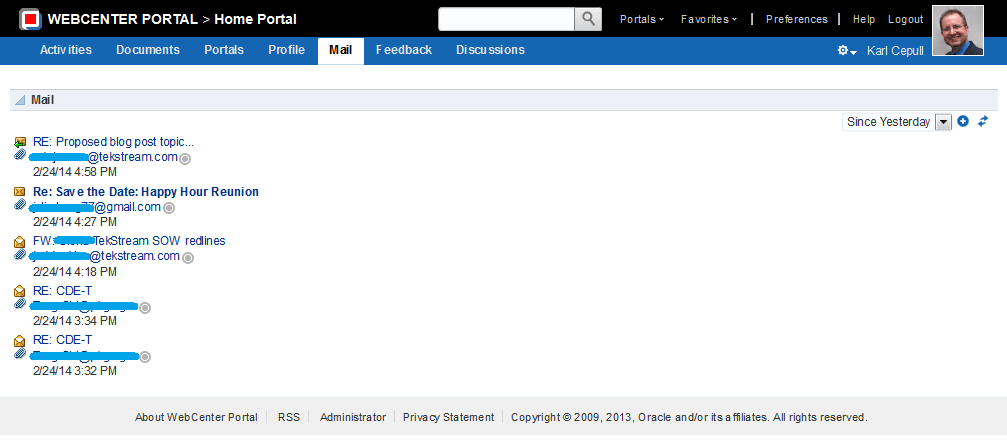
One you have logged back in, you’ll want to do a quick test to see if you can send/receive email from your portal. The easiest way to do this is to create a new page in your Home Portal (or any other portal you have the ability to create a page in). On that page, drop the Mail component. (This can be found in the Social and Communication folder in the out-of-the-box- resource catalog.) Save and Close the page, and you should see a list of mail from your inbox! This successfully tests the IMAP connection to Office365.
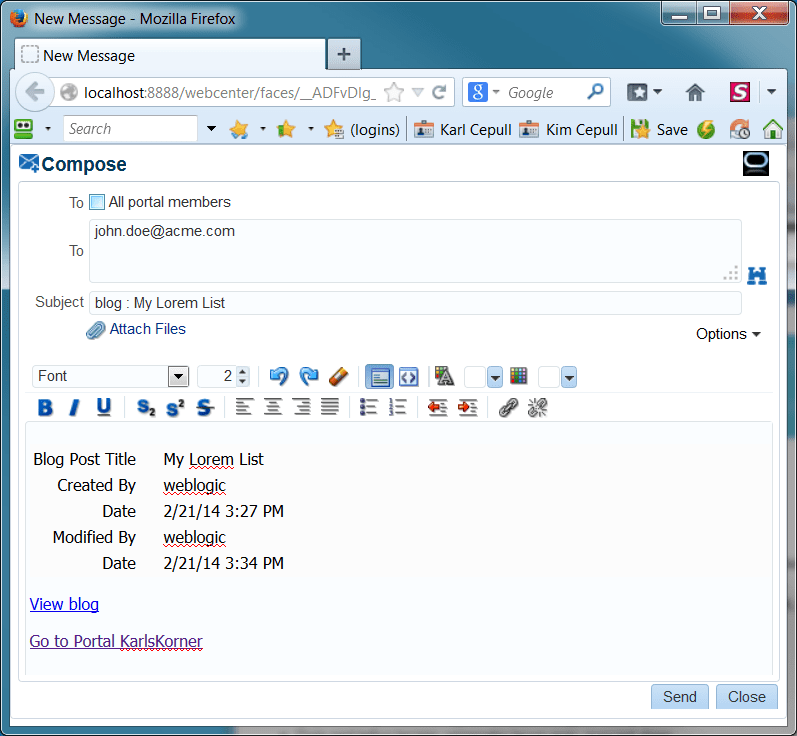
To test the sending part (via SMTP), click the ![]() icon near the top-right of the Mail component to display the Compose dialog (see example below). Enter in a recipient, subject, and body, then click Send to send the email. If all goes well, the Compose dialog will close and your message should be delivered. If there are any problems, you will get a popup dialog with the error. Note that on the Compose screen you can click the Options drop-down and turn on the display of CC, BCC, and Reply-To fields.
icon near the top-right of the Mail component to display the Compose dialog (see example below). Enter in a recipient, subject, and body, then click Send to send the email. If all goes well, the Compose dialog will close and your message should be delivered. If there are any problems, you will get a popup dialog with the error. Note that on the Compose screen you can click the Options drop-down and turn on the display of CC, BCC, and Reply-To fields.
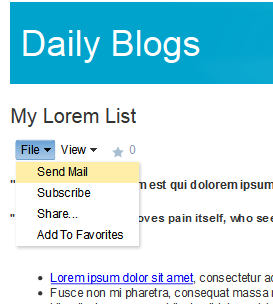 Mail integration permeates WCP. You can send an email message with a link to just about any object in WCP. For example, let’s say you are reading a blog post, and think a coworker of yours might be interested in it. One way you can let them know about it is to send them an email. From the blog post, select “Send Mail” from the File menu.
You will get the Compose screen (below), with details about the blog post, and a link to both the blog entry and the containing portal already inserted into the body of the message. Simply enter an email address and click Send, and your friend will get the email with the links to view the blog post.
I hope that this has given you a good idea on one way to integrate WebCenter Portal (and WebCenter Portal: Framework applications) with Office365 email. For more information about how TekStream can help you integrate your applications, please visit our other Enterprise Portal Blogs, contact us at info@tekstream.com, or request to speak with an Oracle WebCenter Expert by filling out the form below.